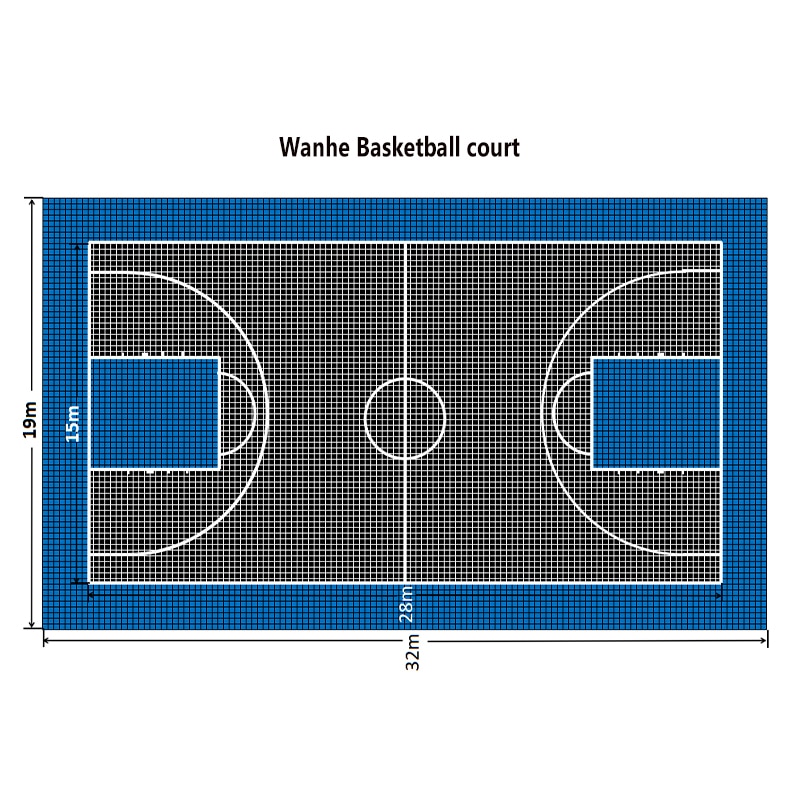
Wanhesport has a pre-paint line service. (We can paint the sports court line in our factory .)
Dimensions
For example, Basketball courts have a three-point arc at both baskets. A basket made from behind this arc is worth three points; a basket made from within this line, or with a player’s foot touching the line, is worth 2 points. The free-throw line, where one stands while taking a foul shot, is located within the three-point arc at 15 feet from the plane of the backboard. A foul shot is worth 1 point, but if a shot is made from the foul line while in play it is still worth 2 points.
First of all, we recommend that you install all the sports tiles first and finish with the ramp edging. The tiles are packed in sequence going from one corner of the baseline to the other corner of the baseline. In other words, the installation will flow from sideline to sideline one row at a time as per the diagram.
On the diagram, the flow will be from left to right starting at the bottom left. You will install one row at a time and adjust the basketball court floor as you go. Please make sure you leave about 3″ for the ramp edging. Don’t forget to point the loops toward the 3-point line and the right sideline (while standing behind the backboard looking toward the 3-point line). After installing the first row, continue to the second row in the same manner until the court is complete.
Preparation Instructions
1. Sort all sports court tiles into piles-by-like items to ensure you have the materials needed to complete the project.
2. Depending on the size of your basketball surface you may need to leave parts of the court off, make a half-court surface, or customize it. If you have enough room to work with, the diagram shown will tell you the official court size.(you can refer the Wanhesport layout picture as below;)

3. Basketball Court layout drawing can be designed by our factory.
4. Before the court line painting, wash the entire area with a pressure washer. If you do not have access to a pressure washer, use a hose and a high-powered nozzle and sweep the area with a broom afterward. Let the surface dry completely before you begin priming.
Additional notes about working with our court tiles Primer:
Wear appropriate eye, skin, and apparel protection when applying primer.
-
- Completely strip all coatings prior to use.
- Do not over-apply or allow the product to puddle. Remove any puddles by spreading product to drier areas or by wiping up excess with a clean cloth.
- On vertical surfaces apply using an airless sprayer or brush.
- Initial foaming may be observed but will disappear upon drying.
- For touch-ups where surface coatings have failed, completely remove any loose or peeling paint by scraping, wire brushing, or grinding.
- New concrete must cure for a minimum of 30 days prior to priming.
- Primer dries to the touch in 2 to 4 hours at 77°F and 50% humidity.
- Additional drying time is needed in cooler temperatures and higher humidity.
If you are interested in painting a center court logo/mascot, make a stencil out of poster board or similar material. Trace the design onto the poster board and cut certain sections out for the easiest use.
Another method for painting a logo/mascot is to use a grid system. With the image set behind or sketched onto a grid of squares on paper, you can create that same grid on the ground, using a tape measure and string line (spacing the squares evenly to mimic the grid on the paper). Then you can simply use the squares as a guide for sketching out the image, and then paint it after it has been sketched.
Build Instructions
1. If painting a logo or mascot on your basketball court key area or side, use the stencil created during the preparation steps, then paint with small brushes. Fill in large areas then create outlines when the paint is dry.
2. If needed, lay out the stencil for the Basketball Court Lines and secure it with tape as necessary (instructions should accompany the stencil). Paint the lines and then fill in the areas using rollers and brushes.
3. Put up the caution tape so that no one steps on the fresh paint, and touch up the area with a small brush as needed.

